Wednesday, June 26, 2013

Cabarita Love

Psst, isn't all this green beautiful! We actually had rain this spring!!!
I think this is one of my favorite shirts ever. I love the colors, the stripes and the pattern only plays up those wonderful features.

Back or alternate front. I was worried about the V being too low in the front but it is not.

In case you don't know what you are looking at this is one of Cake Pattern's latest riff releases. These come with only the basic instructions and no pictures and are marketed more toward the confident seamster than a sewing beginner. The directions were very easy to follow and tracing your size gives you a good fit first try.
The only part I was surprised by was the collar. Never mind that it's been marketed as a tshirt with a collar, I thought it was a yoke piece or something. No. It is a collar.
See. Collar. Not attached to the shirt. Unless you wear it
backwards then it turns into a mini superhero cape!
I sewed it so the seam allowance sits on the right side of the shirt under the collar which is the incorrect thing to do because then you have little bits of serged/sewn seams sticking out at your front shoulders which isn't too professional looking. Next time, gasp, I'll follow the directions and leave the seam on the inside. If you've done understitching at all it really isn't difficult to sew it the way it is written.

Even with its' tiny flaws I love it so much and the hardest part is trying to decide which way to wear it. This is also a stashbust from November for me so I'm very pleased to have this lovely fabric off the floor and in my drawer. Except it's spent most of its time being worn or on the floor waiting to be worn the next morning so......
Happy Stripes to All and to all a good sewing experience.
]

Monday, June 24, 2013

Introducing the Cowboy Star Pants

I showed my not-nephew, Little Man, the amazing cowboy fabric and it's twinkling night sky. We both loved it but I wasn't sure what to do with it until Rae of Made by Rae, released her Parsley Pants pattern. I really enjoy her boy designs and inspirations. He told me he wanted long pants to wear outside. It was a very cold March and this is a light cotton fabric. I was able to hold him back until this Thursday when he walked in the door and practically dragged me downstairs to make "the cowboy star pants, today."

He helped me carefully tape the pieces together and whisked fabric bits away as soon as I got it cut. Just when I was ready to head to the sewing machine he informed me he wanted pockets on his back. I got him to compromise with pockets on the front.
Rae's done a great job with the directions with extra tips on seam finishes to make the pants wear well along with all the modifications available. During nap time I was able to get most of it sewn. I opted to serge the seams then stitch them down. When Little Man likes his clothes he wears them until his mother peels them off his grubby back to throw them in the wash.
He seems to be going through a shy phase when it comes to the camera. He immediately shoved his hands into his pockets and wouldn't take them out til I asked him to sit down. I think they are a success. 
So does he.

Saturday, June 22, 2013

Pajama Party!!

SURPRISE!! It' s a Pajama Party!! 
I signed up for Karen of Did You Make That's Pajama Party. While I didn't manage to make myself any new pj pants I did make four pairs for my wonderful not-nieces and nephew. You asked for jumping photos Karen so here you go!

Wild Little Man Jumps! I think some of these were his ninja moves.
Best hair action of the day!
Everybody catch some air. In case you couldn't figure it out, there was no bed big enough for us to jump on so we had
a pretend slumber party on the trampoline.
Every slumber party needs a good dog pile!
If you aren't sick of pants and kids yet, I've got a few more photos!! hehehe

Yes I did make my pajama pants, about 4 years ago. Hey look! You can even see the kids pants
in this shot too!
We're all worn out now so excuse us while we snore away and get recharged.

Friday, June 21, 2013

Stashbusting to Organize!

For my final June Containment post I'd thought I'd share my ongoing organizing project: Denim Buckets.


I read two great tutorials that you can see here (my original inspiration) and another that is no longer working, then did my own thing. Haha, that's always the way right? So what did I do? Bullet points to the rescue!

  • I used both legs of each pair of my jeans since I wanted the biggest baskets I could make. 
  • I cut the bottoms square instead of trying to get my fabric stand in a perfect circle. To do this you
  1. Fold your bucket tube in half and clip corners, align clips and clip the other corners. Your bucket bottom should now be divided into four sections.
  2. Measure one section. This is the space between two clips.
  3. Cut your square bucket bottom 1/2 inch LARGER than that measurement. This way you will have the correct size bottom for each bucket. 
  4. Sew it up blah, blah all that jazz!
  • The wide end was the top of my bucket which allowed easy fold over at the top. This also makes a handy handle to pick them up and move them around.
  • I didn't use any interfacing since I was using upholstery weight fabric for the inside and heavy denim on the outside. They keep their shape nicely with stuff in them.

They came out all different sizes and shapes and as soon as I got them finished my Mother whisked them away to organize my brother's and my yarn stash. She even helped sew some of the straight side seams. My mother is a budding seamstress. I'm so proud of her.

I still have a few more to make but this put a huge dent in my jeans stash. Now I just need to figure out what to do with all the left over bottoms...

But wait! That's not all I stashbusted this month... guess what else I found on Pinterest....
False
Link to Blog Post and Pattern
Isn't this lovely! You need to check her tutorial out for the directions to do the bottom alone! Fabulous idea! I stashbusted four skeins of "Twisted Polypropylene Maxi-Cord" and made a large version of her bag/bucket. I think it will outlast me!
You can see my Mother absconded with this too.

Closeup of bottom/side transition detail.
If you want to learn to crochet this would be a very easy project. I used the pattern until I got the bottom the size I wanted then I skipped to her directions for the sides and started up. It's easy to change sizes without changing the pattern by simply using different materials. I was using two strands of that heavy yarn and it worked up very quickly. You could also cut fabric strips and crochet them into a pretty basket. I've found yardage I don't like very much can look pretty cute crocheted into something else be it a rug or basket.
So that's as far as I got with this month's theme. How about you? What have you been stashbusting this month? Bags? Dresses? Cushions?

Wednesday, June 19, 2013

June Stashbusting Pinterest Style

Hi Stashbusters,
 How's the organizing going? I decided to take June's theme and use it as an excuse to try several online tutorials I'd seen floating around.

1st: Cation's Collapsible Tote Bag
Boo Hoo for me I forgot to take a photo of it small.
I made this up for my Aunt out of a favorite piece of home decor fabric I'd been hoarding for years.  I think this is a fabulous idea and only made a few changes to her directions.
Attaching the handles after the fact instead of measuring and cutting the nubs on her pattern.
I finished the top of the bag then stitched my handles on.

I had no back and front piece so I sewed the triangles for the collapsible part
 together and centered them on the bag bottom. 
Verdict: This was easy and fun to make. I'm just kicking myself I didn't get a photo of it all stuffed inside itself and tiny. Since I had to send it off as a gift I didn't get to try it out for myself but hopefully it is happy in it's new home in California where plastic bags are a crime and only reusable shopping bags are allowed.

 This was a fabulous, easy to follow translated tutorial. It was a three page PDF that was easy to print out and tape together. I'll bullet point my thoughts for a quick coherent review.

  • This would be a great beginner's project for practicing darts since you sew eight of them. 
  • Speaking of the darts I love the deep bottom they give to this bag. When you set it down it sits instead of tipping over and spilling your stuff all over the floor, table, etc. 
  • For those of us not used to sewing with Burda, remember to ADD YOUR SEAM ALLOWANCE. 
  • I'm not sure what cotton fabric tape is, I used some stuff I had laying around for the handles. It looks really nice together but it doesn't feel very heavy friendly. This isn't a bag I want to carry three books and a bottle of lotion around in but I think it will be perfect for a knitting project or gathering up all those little odds and ends. I do really like how these handles are attached though and if I make it again will do the handles in a heaver weight fabric.
  • I also measured the handles to fit me not according to the measurements she gave in the directions.
  • Buttons. This is what she meant. Took my a bit to figure out...
One on the outside and one on the inside to keep it strong.
The green button is a handmade ceramic button I picked up several years
 ago while visiting friends. I'm so glad to finally have a use for it and have it out and about.
  • This was smaller than I expected but I guess I don't need to carry everything but the kitchen sink around with me all the time. It is still very roomy.
  • No pockets. You could probably add some or just make my third project...
Front and Back
First off, if you haven't made pouches before you probably shouldn't start with this one cause all there is are tantalizingly cute pictures that suck you in and leave you figuring out the nitty gritty details on your own. (it's really not that hard though, don't let me scare you away)
Those are the pattern pieces they have you cut and you can see I cut mine
bigger. I wasn't sure what I was going to put in it and didn't want to limit
myself.  Maybe there's a mathmatical answer to these ratios but I can't even
spell mathmatical much less figure out the math...


Top Left: Reminder to topstitch before sewing up side seams. You can't make it into the corners
 and may break a needle. You have to topstitch otherwise the lining gets caught in the zipper.
Top Right: How I sewed on the "bow". Any other ideas on how to do this invisibly?
Bottom: Pretty insides...
Fill it up and the bow gets more bowy and cute! Part of me wants an excuse to make a jillion of these then my sanity returns and I realize I would get sick of making a jillion, maybe I'll settle for two or three. 
Fun Fact: this tweedy outer fabric came from the leftovers of the very first jacket I ever made when I was 16. I loved that jacket and wore it until I became too... womanly?.. and it wouldn't button up any more... I'm so glad to have a little piece of this fabric back in my life.

Well, that's all I've got for ya now, Friday we'll discuss my bigger organizing adventures so until then I'll leave you staring off into the sunrise with my fun new creations.

Monday, June 17, 2013

Brown Tencel Tunic


 After several pilly tee shirts and see through online knit buys, I went on a hunt for a more satisfying knit experience. I did my research and found tencel. It is supposed to wear extremely well; getting softer the longer you use it. It is also supposed to have moisture wicking abilities and odor killing properties. For all the “green” people out there tencel is good for the earth, I don’t remember exactly why and how, but good for the earth is always, well, good.

Sorry about the lighting, still working on photos.

What I made: I wanted to add this to my traveling wardrobe. I chose long sleeves since I’m usually cold and wanted something that felt like a dress but not a dress so I don’t have problems with airport security and have easy access to my insulin pump. I also decided to jump on the high/low trend. 

Pattern: Altered TNT knit shirt to tunic.

What I learned:
  • High/low hem. If I do this again in a lightweight fabric I will not flair out the front side seam so the back will swoop up in a clean line instead of rippling and folding on itself. 
  • High/low hems are easy to draw in. I lengthened the front about an inch and freely drew in the back curve.
  • Skinny arm bands for an easy clean finish. 
  • I used Megan N. tutorial for the neckbinding. It worked wonderfully.
  • Embroidery on Knits
  1. I used double sided wonder under to tack the hem down. It took longer than usual for it to adhere.
  2. After various transfer experiments I decided to freehand the design. I did the bottom running stitch along the measured hemline then laid down masking tape for the top line. I freehanded the stars being careful to not pull the stitches too tight. 
  • At the last minute I decided to scrunch up a scrap for some fun neckline detail and loosely embroidered it on so there would be some red at the top to pull it together.

The verdict: I’m in love!! The fabric was thinner than I was expecting but it is buttery smooth and silky. You feel like you are wrapped in a deliciously soft, warm cloud. Worn alone the wind will blow through it but worn as an under-layer it heats you right up. 
The first time I wore it over 24 hours straight. I put it on in the afternoon, slept in it, got up and wore it all day. There were no wrinkles and no stink. We’ll see how it does when I get all sweaty. 
I love the pop of color the embroidery gives it, how simple the style is and how easy it will be to dress up or down. Now I just need to make some skinny jeans to go with it!
Feeling fabulous. Dog and kitty, not so much...

Wednesday, June 12, 2013

Fear of Pants

I am afraid of making pants (trousers for all you foreigners). I think they are complicated, scary and confusing. I decided the only way to overcome my fears is by making lots of them, different kinds, different patterns, different alterations. I will find the perfect pair of pants for me!

With this goal in mind I decided to break out an interesting pants pattern I had bought a couple years ago: Vogue 1050.
V1050
Vogue 1050
It lured me in with its cool contrast pleat and flowing legs.
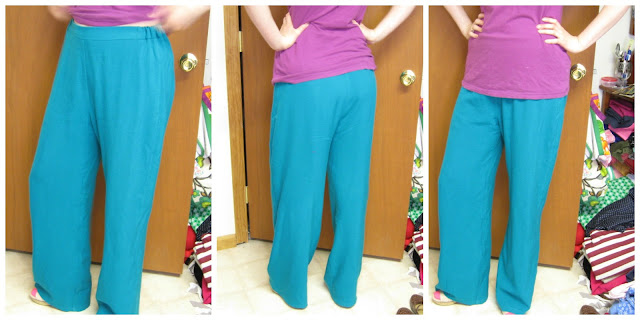
I had just gotten some vibrant green fabric in a loose weave that should be very cool for the summer and decided to give this pattern a go. After reading all the PatternReview reviews I decided to not do the inset pleat to make a more wearable everyday look. I also wanted something without zippers, easy to pull on and off and something I could adjust, depending on where my infusion set was placed. Yes, I'm a Type 1 Diabetic with an OmniPod pump.

Look away all squeamish people! When this is attached to my stomach
any kind of pressure on it drives me crazy. 
Trusting the advice on PatternReview I omitted the zipper and cut the elastic shorter than the pattern said. I made it as tight as I could yet still be able to pull it over my hips.


While I do feel this leans closer towards classy pajama bottoms than classy travel wear, they are very comfortable and adjustable which was what I was going for.
Come sort patterns in your pjs with me!! Any takers?
You can see the side seam bunches here but
it's not that noticeable when your shirt covers it
and you are busy living life.
I really like the loose, wide leg pant; much less fitting issues, but my mother thinks I need to make something that will show my legs a little more. I do need to figure out how to make skinny jeans for my billowy tunic tops so maybe that will be next on the agenda.
I probably won't be making this pattern again since it's a bit fancy for pajama pants and I have no "Tissue Faille or Lightweight Crepe"stashed to make a classy pair like on the pattern cover. It's gotten me ready to tackle zipper insertion in pants again. I just need to decide on a fly front, invisible zipper or side zipper? Do you have a preference?

Wednesday, June 5, 2013

Black Tie Pattern Event

STASHBUSTERS! DON'T LOOK! THIS POST IS NOT FRIENDLY TOWARDS DECREASING THE STASH.

Hello Everyone else! Or should I say,
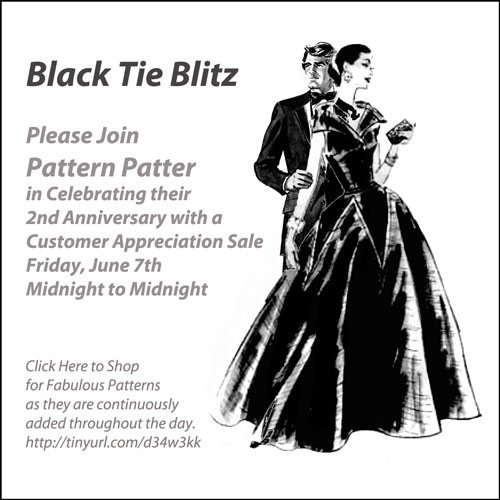
 Good Evening, Ladies and Gentlemen. You are all cordially invited to my wonderful team's Black Tie Blitz.

I personally will be offering 20% off your entire order with the coupon code: BLKTIE20

I did some revamping of my shop and thought I'd share a little run down of how I break things up and give you some deal finding secrets.
Fabulous Frock Patterns
This is what it says, all my lovely dress patterns for Bust Sizes 30 to 36 if you want anything bigger you need to check out my Buxom Beauties section for Busts 38 and up.
Winter, spring, summer or fall, all you've got do is call,
If you're just looking for a good deal, which sometimes is all we're looking for, I made a totally new category, Eight Dollars or Less
This is where you'll find most of my modern patterns, very simple designs, the ones I think are just plain ugly, and the occasional incomplete pattern.

I also have a category for all the Magnificent Men in our lives! Hopefully I'll get it better filled out soon.
This is what passes for dress up where I live. I'm planning on getting it counted
and listed...

While all other pajama patterns go in my other new section, Unmentionables and PJs, Men get to keep theirs separate.

If you're sick of sewing clothes, check out my Holiday and Crafts, full of random sewing books, knitting and crochet patterns, and all the creepy doll patterns I manage to buy.

Or if you're looking for some special fabric for that special vintage pattern check out Fabric Books and Notions for all the wild and weird fabrics I can find, in remnants, sheets and yardage. 

If you think all this is fabulous and want to see more be sure to stop by our PatternPatter's Blitz thread on Friday for the main list of shop sales and all the new patterns getting listed throughout the day.
Thank you for your patience with this announcement. I'm off to wriggle into my dress.... See you there!

Monday, June 3, 2013

June Stashbusting

Happy June, Stashbusters!
 This puts us almost at the halfway mark for the year! Can you believe time is flying so quickly? May was a busy month for me since I participated in MMM and did my best to decrease the knit stash. Check out people's amazing knit creations on Flickr and go vote on the projects created here.

As for June, it's a new month with a new challenge: 


Containment! Get ready for those long car trips, summer outings or some good old fashioned cleaning and organizing! This month is all about making things to put things in! 
I've started a fabulous pinboard, if I do say so myself, with lots of great container ideas. This is a no pressure month with no contests. Just you facing down your own stash. Please remember, you don't have to participate in the month's theme if you don't want to. They are there for fun and encouragement.  The goal is to be using up the stash however you choose to do it. 
So go forth my friends and STASHBUST!

Saturday, June 1, 2013

Me Made May Final Roundup and Thoughts

Well its done! I completed my first Me Made May! I had pledged to wear at least one me-made garment every day and take daily photos.
May 26th African Wax Print Dress

May 27th Red Dot top again.

May 28th Pink Tira Test run

My 29th, Brown knit dress

May 30th, finished Tiramisu

May 31st New Stripe Top and a Fond Farewell.
As you can see I was able to complete my goals. It was a good challenge, one that gave me pause for thought yet didn't leave me crying in frustration halfway through. To keep myself from rambling, I'm going to pull out the trusty bullet points.

  • I learned I don't wear my handmade garments as often as I thought I did. Granted this is a transitional time of year and I've only started sewing everyday garb last September so there are still plenty of holes that need filling. 
  • I had accurately assessed what I need to make if I plan to wear me mades on a daily basis. Bring on the trousers and tops.
  • The rest of the world wears dresses and skirts on a regular basis. I need to move there! Dresses are such an oddity here and that's probably mostly because of the way of life, but I'd still like to be able to pull on a dress and not be the weird one. But I'm always going to be a bit weird regardless of what I'm wearing so C'est la vie.
  • I need to visit Britain and go tights shopping. Preferably red tights. Thick warm squishy tights. If your country has some or you know where to get them in the US let me know. 
  • Daily photos! What an exercise in self esteem. I'm usually the one behind the camera and having to get in front of it every day was enlightening. The first two weeks I had to keep from tearing myself down every time I edited photos. The last two weeks were much more relaxed as I got more comfortable in front of the camera and realized a photo doesn't tell the whole story. You wonderful ladies of the flickr group helped tremendously with this by showing me all your beautiful faces being happy, sad or silly (HeatherB, I'm looking at you!).
  • What a fabulous community to be a part of! I "met" so many amazing ladies of all ages and I can't wait to take my time going back through the Flickr pool and getting to know you better through your blogs. If I ever get Korean learned, I feel the need to start on Japanese next because those ladies have such classy style! How do they pull that off?
Well that's all the reasons I can remember at the moment... Thanks to Zoe and everyone else for a lovely experience!