Showing posts with label refashion. Show all posts

Friday, August 16, 2013

Sleeves to Shorts Refashion

Well I did manage to get some stash refashioning done this week, with kids to boot. If you can't tell I'm pretty proud of myself! I've been loving the bubble shorts for awhile now and while taking this old dress apart I thought the sleeves looked like cute pre-made bubbles if I could figure out how to shape them for a bum.
So, Giggles, aka. Not-Niece 2, and I started out with a dress in pieces and ended with cute shorts.


Stealing one of Cation's words, here's my FAKEtorial on how I did this!
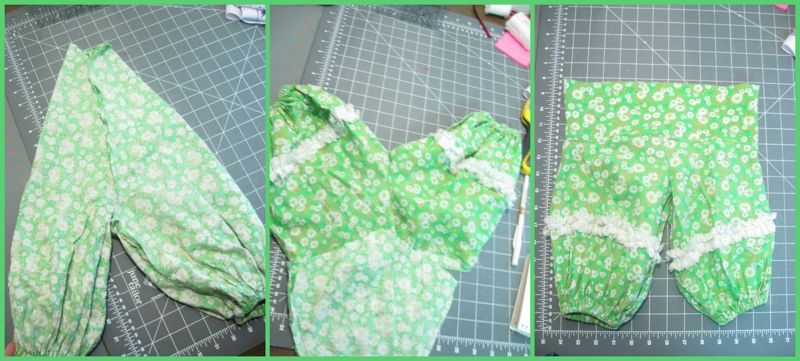
1. I used Made By Rae's Parsley Pants Pattern to trace the front and back crotch line on one sleeve.
2. I inserted one sleeve inside the other and sewed along the line. I trimmed afterward.
3. Realized the top was WAY TOO SKINNY and hacked of a chunk.
4. At this point I had two legs and no bum coverage so I tried them on the kid and measured 4 inches would give her wedgyless shorts.
5. Cut and 8 inch wide strip of fabric that was the same length as the shorts and sewed it into a tube!
6. Folded tube in half and sewed to shorts. Topstitched.
7. Measured elastic, sewed a casing, and inserted through hole in the side seam. Sewed elastic and boom! Shorts!

Basically you're just doing the same steps you would use for any elastic waist kid's pants. I think this would work even better if you were using larger sleeves because then you could cut the whole width of the waistband and wouldn't have to bother with adding a band to make them long enough.
Bum coverage and closeup of back seam.
We had fun and I'm excited that my idea actually worked! There was a moment of panic as I went to sew but I figured I wasn't losing much if it failed since it was old fabric anyway.


So there you have it! The smallest refashion I had planned. Let me know if you need more clarification on the steps or if you'd be interested in an actual step by step tutorial.
How are things going on your end? Have you gotten to sew anything up?

Wednesday, November 14, 2012

Refashioned Birthday Gifts

I'm copping out on the more serious posts I had planned to give you this quick project I whipped up for one of my Not-Nieces. She turned 3 today! Her favorite colors are green and yellow.
And just a disclaimer before we begin the show and tell. Yes, this is probably a bit too big. Yes, snow and general winter temperatures have arrived. BUT She has tall genes and I intentionally made it big so she can layer it now and wear it this summer.


TaDa! A cute jumper dress.
 This started its life with me as an unfinished skirt. No waistband, zipper, hem. Even the embroidered panels were not finished.

I removed the three un-embroidered panels and sewed up the zipper opening. I folded it where I wanted the center front and center back to lay. After playing around with some pattern pieces I ended up with this:

It took some fiddling since the "front and back" swung out instead of a straight line. I finally just lined it up and winged it. I figured since it was supposed to be looser fitting I wouldn't sweat it.
I added binding to the armholes. Then sewed up the shoulder seams so the seam would be caught when I flipped the binding over and topstitched. I added the neckline binding and flipped it all to the inside. I decided the cleaner looking finish let the embroidery shine.
It was a pretty wide skirt so I stitched a ribbon to the front. Quick Tip: 100% Polyester ribbon will melt and seal the ends to prevent fraying if you hold it to a flame. Be careful not to blacken the edges or burn your fingers. This will work on blends, not as well, and they can actually catch on fire so kids, please don't try this at home.

Isn't the embroidery pretty. I really like the tone on tone effect.
For the "buttons" I took apart an old cufflink. One has more wear than the other but I think it adds character. I hemmed it with a blind hem.
Super cute.
There it is! My super quick refashion! Do you have any great ideas for refashioning skirts?